
Merging Projects For ICA Analysis
The following instructions assume 2 independent coders. If you work with more coders, you have to repeat the merge process. You can only merge two projects at a time.
We recommend that you import the project bundle files of coder 1 and 2 before merging them for inspection. Did the coders do what they were supposed to do? Did they send you the correct project?
Create a copy of coder 1's project. Name the copy something like 'Project for ICA XY coder 1 and 2'. Merge the project of coder 2 into this version of the project.
Before the project merge, set the project into inter-coder mode:
From the main menu, select Analysis > Intercoder Agreement Mode.
Next, select Project > Merge with Project from the main menu, and select the project of coder 2 to be merged. This is the import project. Follow the instructions on the screen. There should be no merge conflicts. For more detail see Project Merge.
When you set up the project correctly and all coders did what they were supposed to do, there should be no merge conflict. If there is a merge conflict, having inspected the projects beforehand will give you an idea what went wrong and what to do.
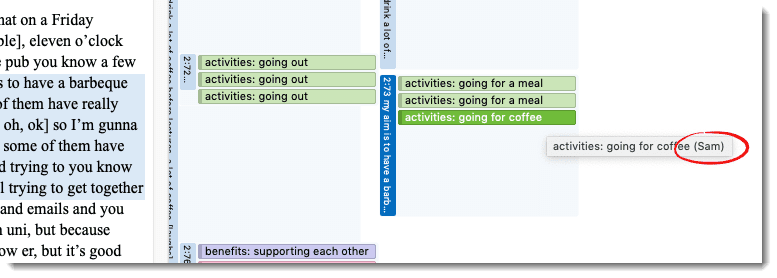
After merging in ICA mode, The codings of all coders will become visible.
Open one document and take a look at the margin area. If you see the same codes applied to the same quotations, this is good. It means the two coders agree. If you hover over the code, you see the name of the coder who applied the code.
The ability to see who has coded what in the margin area is useful for some purposes, e.g., if you want to discuss data segments where coders did not agree. However, there is no need to manually check all codings in the margin. For this you can run the inter-coder agreement analysis. See Running an Inter-coder Agreement Analysis.
A coding is the link between a code and a quotation. In ICA mode, you can see which coder has applied which code to a quotation.