
Creating and Applying Codes
Video Tutorial: How to code data.
Creating New Codes without Coding
You can create codes that have not (yet) been used for coding. Such codes are called "free" codes. See Coding Data - Basic Concepts. This can for example be useful when ideas for codes come to mind during normal coding work and that cannot be applied to the current segment but will be useful later. If you already have a list of codes, possibly including code descriptions and groupings elsewhere, you can use the option: Importing A List Of Codes.
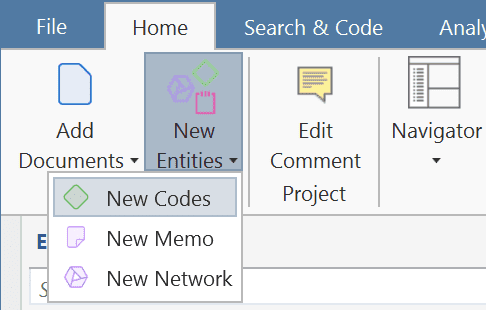
In the Home tab, click on New Entities and from the drop-down menu select New Code(s). The short-cut key combination is Ctrl+K.
You can also create new codes in the Code Manager.
Click on the button New Codes in the ribbon of the Code Manager.
Coding with a New Code
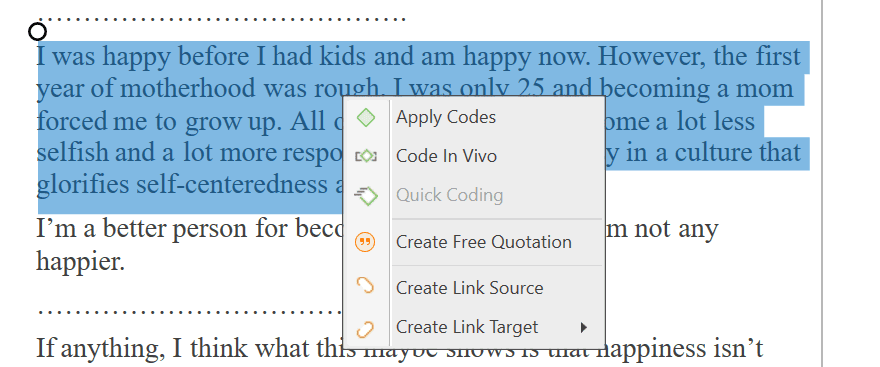
Open a document and highlight a data segment, i.e., a piece of text, audio or video data, an area in a graphic document, or a location in a geo document.
Right-click and select Apply Codes, or use the short-cut Ctrl+J, or click on the 'Apply Codes' button in the ribbon.
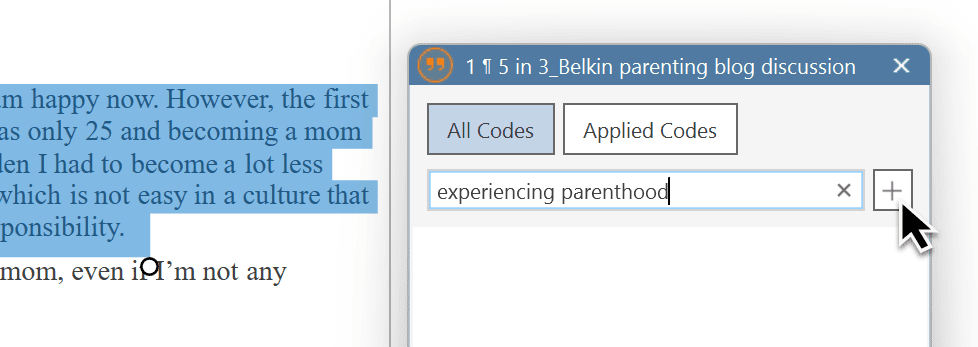
Enter a name and click on the plus button or press enter. After the code is created, you can enter a definition in the comment field.
 You can continue to add more codes, or simply continue to select another data segment. The dialogue closes automatically.
for more information on working with data other than text, see Working With Multimedia Data and Working With Geo Docs.
Code In-Vivo
Use in-vivo coding when the text itself contains a useful and meaningful name for a code.
In-Vivo coding can only be applied to textual primary documents.
In-vivo coding creates a quotation from the selected text AND uses the selected text as the code name. If the selected text's boundaries are not exactly what you want for the quotation, modifying the quotation's "spread" is often the next step after creating the in-vivo code. See Working with Codes > Modifying the length of a coded segment.
Select a segment in a text document, right-click and select Code in Vivo, or the corresponding button in the ribbon (Windows) / toolbar (Mac).
"Over-dependence on in-vivo codes ... 'can limit your ability to transcend to more conceptual and theoretical levels of analysis and insight' (Saldana, 2009:77). Where they are descriptive and unique to one person, the coder needs to move on from them quite quickly to generate a more analytical code." (Bazeley, 2013:166).
Display of Coded Data Segments in the Margin Area
The coded segment is displayed in the margin area. A blue bar marks the size of the coded segment (= quotation), and the code name appears next to it. When coding data in this way, a new quotation is created automatically, and the code is linked to this quotation.
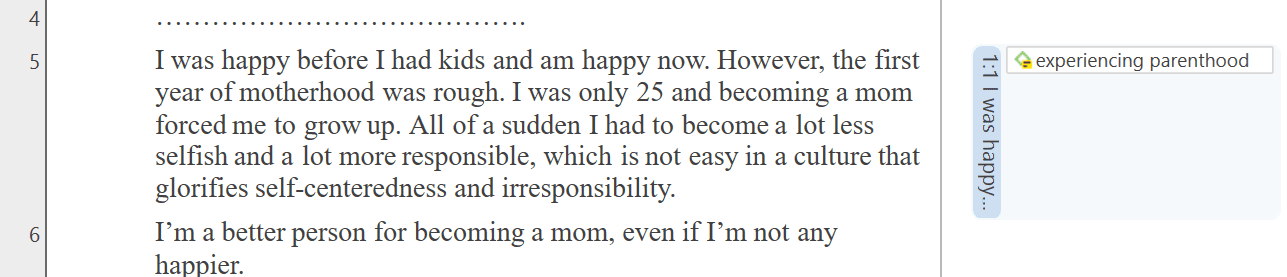
The yellow post-it within the code icon indicates that a comment has been written for this code.
Applying Existing Codes
Existing codes can be applied using the Coding Dialogue or via Drag & Drop.
Using the Coding Dialogue
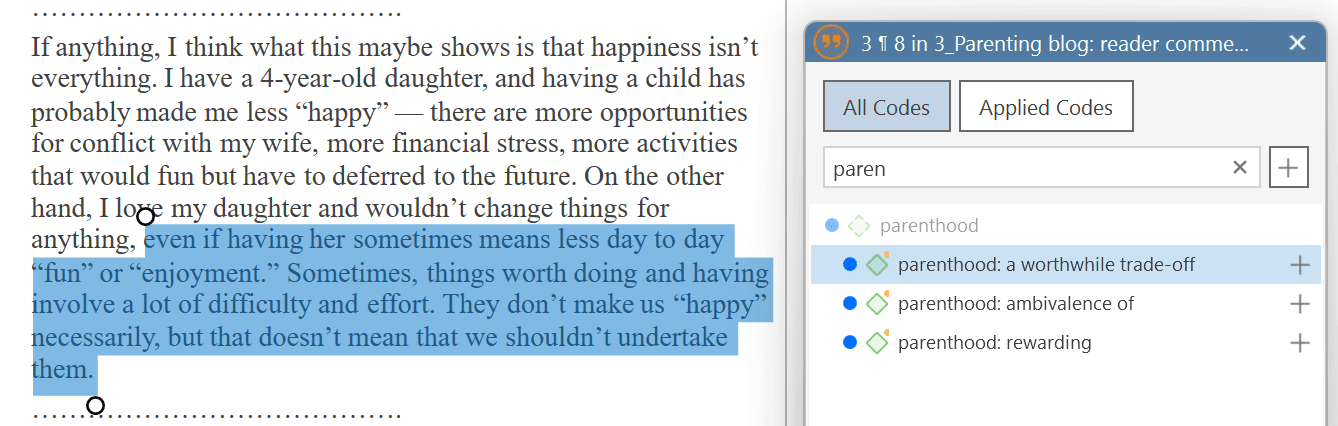
Highlight a data segment, right-click and select Apply Codes, or simply double-click on the quotation.
 It is easy to quickly jump to the code you are looking for by entering the first few letters of the code in the search field.
Select one of the existing codes, click on the plus button or press Enter.
Drag-and-Drop Coding
Drag-and-Drop Coding is possible from the following locations:
- the Codes branch from the Project Explorer
- the Code Browser in the navigation panel.
- the Code Manager
At the end of this chapter, you find other Drag-and-Drop options that are also available for your convenience.
Drag & Drop Coding from the Code Browser
To open the Code Browser, go to the Home ribbon and select Codes from the Navigator section. The search field in the Code Browser facilitates handling a longer code list. Rather than scrolling the list, you enter the first letters of a code.
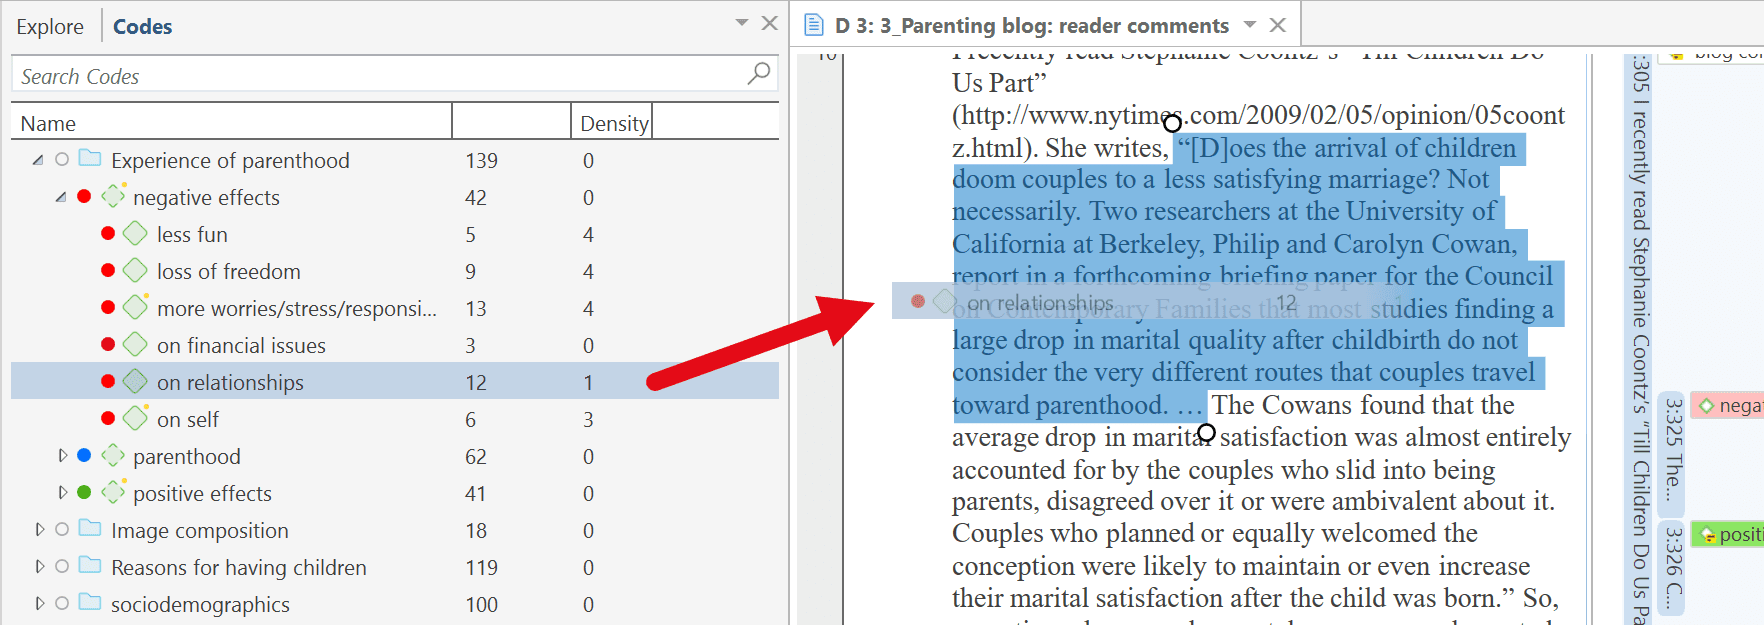
Highlight a data segment, select one or more codes from the code list and drag the code onto the highlighted data segment.
By the way, in case you were wondering, code density is not a value that is calculated by the software. It goes up, when the researcher begins to link codes to each other. See Working With Networks.
Drag & Drop Coding from the Code Manager
When using the Code Manager for drag & drop coding, it is recommended to place it next to the data you are coding into a new tab group. See Working With Docked And Floated Windows. You can quickly access codes using code groups to filter the code list, or by using the search field. In the Code Manager you can see and edit code comments.
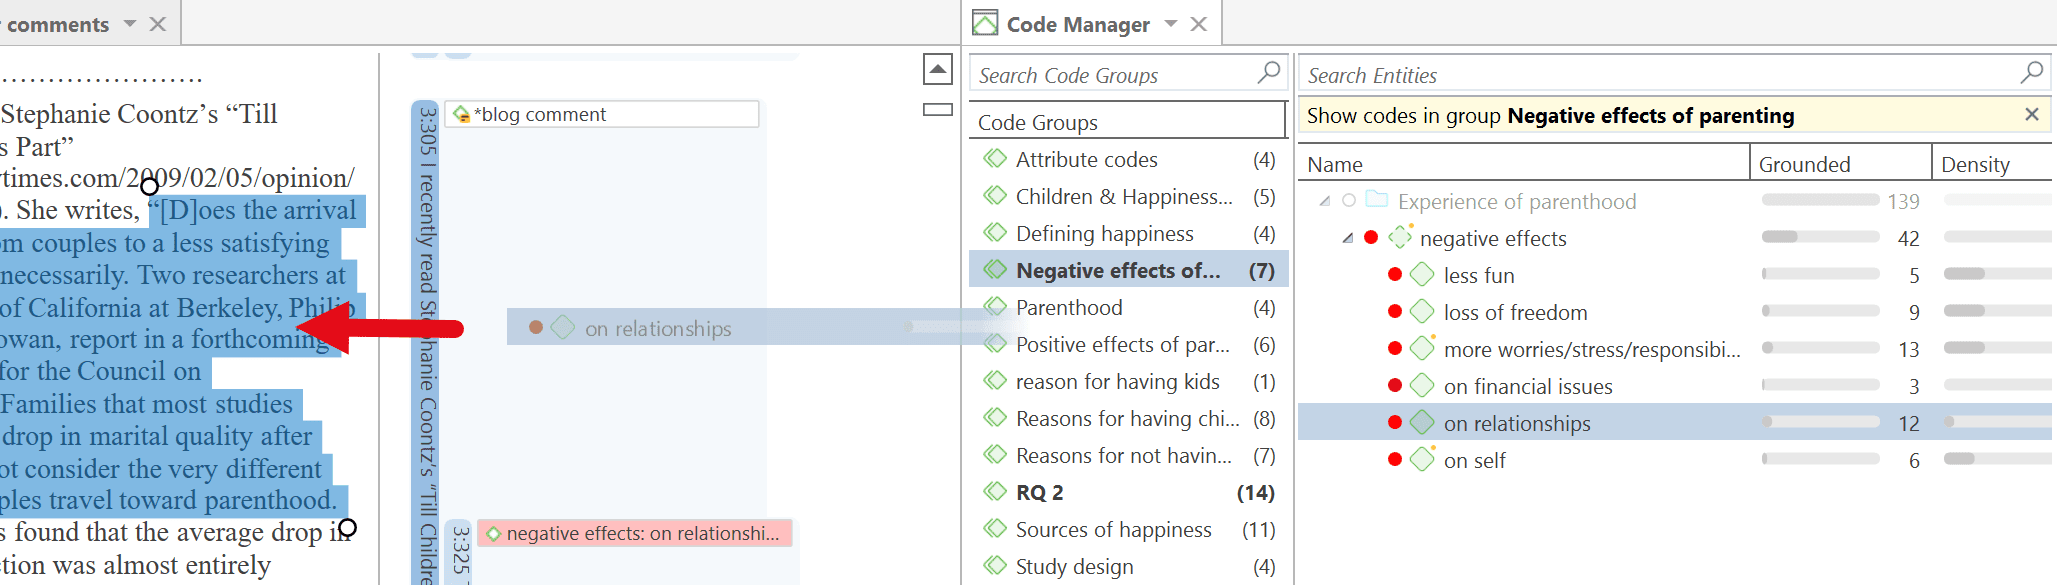
Highlight a data segment, select one or more codes from the code list and drag the code onto the highlighted data segment.
Quick Coding
Quick Coding assigns the last used code to the current data segment. This is an efficient method for the consecutive coding of segments using the most recently used code.
Highlight a data segment or click on an existing quotation.
Right click and select Quick Coding from the context menu, or use the short-cut Ctrl+L. Another option is to click on the Quick Coding button in the ribbon.
Document Ribbon when Coding

Create Free Quotation: Use of you want to create a quotation without coding it.
Apply Codes: Opens the Coding Dialogue.
Code In vivo: In-vivo coding creates a quotation from the selected text AND uses the selected text as the code name.
Quick Coding: Quick Coding assigns the last used code to the current data segment.
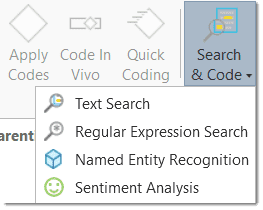
Search & Code: You can access the four Search & Code functions from here:
Focus Group Coding: You can start the Focus Group Coding function from here.
Rename: This allows you to rename a selected quotation.
Delete: Select a code in the margin area or a quotation. Only the quotation will be deleted.
Unlink: You can unlink codes from a quotation, or a hyperlink using this option.
Reverse Link: Reverses the link of a selected hyperlink.
Relation: Opens the Relation Manager.
Comment: Click the drop-down arrow and select which comment you want to view or edit.
Word Cloud: Creates a word cloud from the document.
Word List: Creates a word list from the document.
Concepts: Searches for concepts in your data to review and autocode. See Concept Search.
Search Document: Searches the content of the document.
Edit: Starts edit mode, so you can modify the content of the document. When selected the ribbon changes, and you see the available edit options:

Print: Click on this option if you want to print the document as you see it on your screen including the margin area. After clicking this option, the following printer dialog opens:
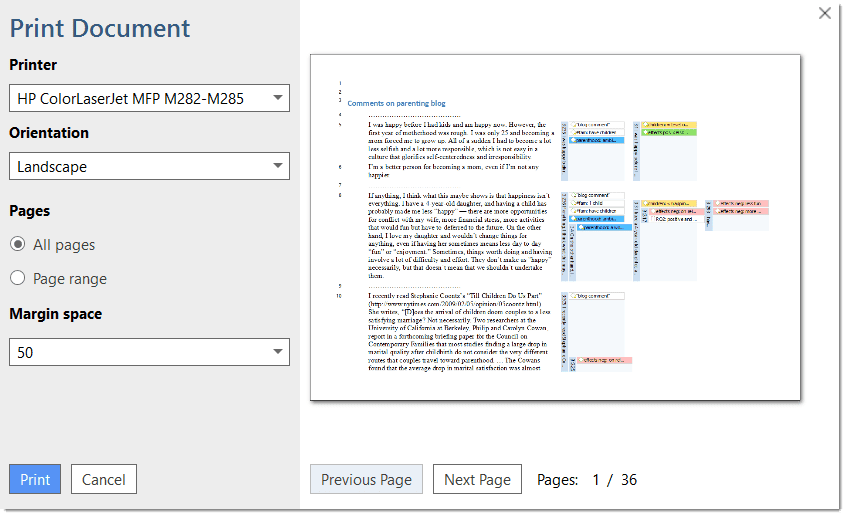
Printer: Select if you want to send the output to a printer or whether you want to save it as PDF document.
Orientation: The default selection is 'Landscape', as this is likely the best option to see the document and all codes in the margin area.
Margin space: Under 'Margin space', you can adjust the width of the margin if you need more or less space.
Pages: You can print all pages, or a page range.
With the 'Previous' and 'Next Page' buttons you can preview all pages.
The print with margin option is available for text, PDF and image documents.
Keyboard Shortcuts For Coding
| Coding | Short-Cut |
|---|---|
| Create Free Code | Ctrl+K |
| Apply Codes | Ctrl+J |
| Quick Coding | Ctrl+L |
| Code In-Vivo | Shift + Ctrl + V |
More Drag-And-Drop Options
-
You can drag-and-drop quotations in the Quotation Manager to a code in the side-panel in the Quotation Manager.
-
You can drag-and-drop quotations from the Quotation Manager to a code in Code Manager.
-
You can drag-and-drop one or more codes to a quotation in the Quotation Manager.
-
You can drag-and-drop one or more codes to a quotation in the Quotation Browser in the Navigation Panel.
-
You can drag-and-drop quotations from the Quotation Browser to a code in Code Manager.
-
You can drag-and-drop quotations from the Quotation Browser in the Navigation panel to a code in side panel of the Quotation Manager.